|
|
MECH 200 Engineering
Drawing
Lab 2: Multiple 2-D Orthographic Drawings |
Objective
- To understand the concept of Orthographic projections
and create a drawing for the bracket in 3 views.
- To use AutoCAD commands like dim, dtext,
ddedit..etc.
- To create layers, titleblock & revision
tables.
Introduction & Concepts
In the previous lab, you drew a disk and a plate. These were basically flat objects with a uniform thickness. In the real world of CAD applications, the items to be drawn are fully three-dimensional and often require at least three different views to depict effectively. Orthographic Projection is a system of three views that is commonly used in these situations. You can think of orthographic projection as a rulebook that governs the choice and placement of front, top and side views, resulting in a workable 3D technical representation using only 2D images. This lab also gives you insight into how technical drawings are setup and notated in the real world. Useful information if you plan on using AutoCAD during co-op workterms!
Orthographic Projection
The term Orthogonal is a mathematical term meaning "at right angles to". It comes originally from the Greek word ortho, which means straight, correct, or at right angles. You can see what this means in AutoCAD by toggling the ortho mode on and off with the <F4> key and drawing a few lines... Notice how you can only enter new endpoints at 0, 90 or 270 degrees to the previous point when the ortho mode is on.
An orthographic projection is created by
looking at a three-dimensional object from an orthogonal viewpoint and deriving
three two-dimensional projections from this view, as shown below in Figure 1
Notice how the Orthographic
views form an transparent cube around the object to be depicted. Each view's
image is an orthographic projection of the object within...That is to say each view is projected onto its
respective orthographic viewplane.
When you define an
orthographic projection, it is entirely up to you which view will serve as the
front (Some objects such as cars, aircraft, houses and computer monitors have
obvious front views, so use your common sense). Whenever the front view is
decided, the top and (right) side views are also defined by their orthogonal
relationship with the front view.
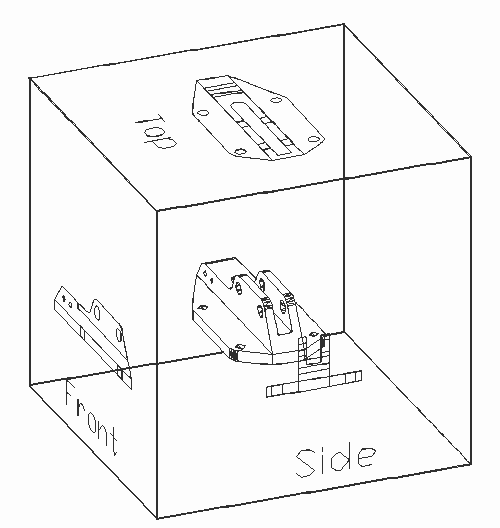
Figure 1: The Bracket in an
Orthographic Projection
The three views of the
orthographic projection allow us to depict the 3D object using only 2D pictures
- There is a catch though. The three views must be properly oriented and
aligned with each other when they are drawn on paper, or their implied 3D
relationships will not be communicated (definitely bad).
Imagine that the edge between the front and
top views is actually a hinge. Now imagine that the edge between the front and
side views is also a hinge. Next, swing the top and side views around these
hinges until they are aligned with the plane of the front view, and you will
notice that the views are aligned orthographically in two dimensions. This
meets the requirements of orthographic projection lay-out.
Figure 2: Aligning the Orthographic Views into One Plane (will appear at a later point)
Technical Drawings In The Real World
In the last lab you gave no thought to the scale, notation, paper-size or method your drawings would be printed with. As you can probably imagine, CAD drawings are of limited use on a computer screen. Hard copy is essential if any drawing is to be useful in the real world.
Just as there are standards governing the
drawing process, there are standards that apply to the notation, signature and
printing of technical drawings. While these standards vary between employers
and applications, they are universally applied in all CAD applications.
The Titleblock
We Engineers often claim that Artists have it easy. This is certainly true when it comes to signing their work. A signature and a year are often all that is required of an oil painter, while an Engineer about to release a technical drawing has things are a bit more complicated than his or her artistic counterpart. Information such as the date, the designer, the draftsperson, the scale, the revision, the page number, the company and the project must be included on any engineering drawing in a standardardized form.
The traditional device used to accomplish this task is called the Titleblock. It is a rectangular box divided into rows of smaller boxes, each of which contains formatted text information. Here is a sample titleblock:

Figure 3: The Titleblock
Used by Yoyodyne Aerospace
As a rule, every drawing produced by a given company will use the same titleblock design. Typically, the titleblock is locked into one of the corners of the drawing frame. In the example above, the titleblock is always located in the lower right-hand corner of every landscape oriented drawing.
The Revision Table
Since drawings change over time as the designs they depict evolve, there is a need to keep track of the changes made. This is accomplished with the help of a device called the Revision Table. The revision table contains a row for every stage of revisions made to the drawing. This row contains the date of revision, the initials of the revisor, and a brief description of the changes made. The revision table expands by one row each time the drawing changes, often requiring that its size be restricted to the most previous revisions in order to leave space for the actual drawing!

Figure 4: The Revision Table Used by Yoyodyne Aerospace
Adding Text to AutoCAD
Drawings
Text is a very important component of any technical drawing. Although you will find that dimension text is automatically generated by AutoCAD in the dimensioning commands to notate the dimensions you will create, you will still have a need for individual text entities when you create Titleblocks, Revision Tables, and paragraphs of notes in your drawing. This Concept topic explains how AutoCAD handles these issues.
Text Styles
A Text Style is a set of parameters that AutoCAD uses to control how text is created. All AutoCAD drawings have a default text style called STANDARD, which uses the stick-like txt font. AutoCAD prefers simple fonts because they require less system power to display and print, and they also tend to be more legible, which as you might recall is one of the main criteria in technical drawings.
You can create a custom text style in AutoCAD with the style command. While running this command, AutoCAD will prompt you to specify the following style attributes:
- Font: These fonts are described by shape files with a *.shx extension - The font used in Figure 4, above is romans.shx.
- Size: This is not a scale factor - It is the actual height that the lettering will have according to your set limits.
- Width Factor: A scale factor between 0 and 2 that allows you to stretch the font horizontally - 1 is the default
- Oblique Angle: An angle used to slant the font to create italics. leave this at 0.
AutoCAD will prompt you as follows:
Command:
style
Text style name (or ?)
<STANDARD>: mystyle
If the style name you enter
is new to the current drawing file, AutoCAD will assume you wish to choose a
new font and open a font selection dialog box:
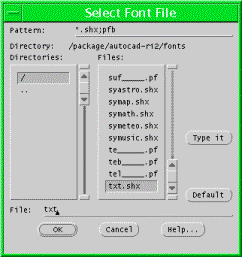
Figure 5: The Style Command's Font Selection dialog box
Once the appropriate font file ( a file with a *.shx extension) has been selected, AutoCAD will return to the command prompts as follows:
New
style. Height <0.0000>: 5
Width
factor <1.0000>:
Obliquing
angle <0>:
Backwards?
<N>
Upside-down?
<N>
Vertical?
<N>
MYSTYLE is now the current text style.
The Dynamic Text Command: dtext
The dtext command is the quickest and best way to create text entities in your drawing. AutoCAD will prompt you for the base point to enter the text at, ask if you want the text rotated (default is 0 degrees), and then prompt you for the text. You can enter carriage returns to go to a new line of text, and you can also enter a new start point at any time during text entry. When you are done, hit the <Enter> key twice to end the command.
Dynamic Text Editing: ddedit
The ddedit command allows you to correct or change any text you have entered with dtext. AutoCAD will first prompt you to select the offending text, and then open a dialog box with the original text for editing. This is the best way to edit text in AutoCAD, and it even works on dimensions created by the dim commands!
Drawing
Scale
Last week's lab had you redefine AutoCAD's limits to encompass the plate and the disk. You weren't actually told whether these items were measured in inches, millimeters, or miles, nor did it matter what size paper you wanted to print to. In the real world, these issues are of extreme importance and are related to each other through the drawing scale.
To get an idea of drawing
scale, consider this week's requirement that your lab drawing fit on size A2
paper. A2 is a metric standard
paper size of 420 X 594 millimeters, so you are instructed to set your AutoCAD
drawing limits accordingly: Lower left-hand corner is (0, 0) and upper
right-hand corner is (594,420).
Once you have reset the limits, you and your drawing have made a deal regarding
the coordinate units in AutoCAD's virtual universe. They are now millimeters,
and your drawing's new limits represent the page you will be printing to. At
this point you now have to consider whether or not you can fit your three
orthographic projection views within this page...Can you?
A quick examination of the
bracket reveals its measurements to be 180 x 90 x 52 millimeters... It's not
too hard to see that there is plenty of room on a piece of A2 paper to
accomodate three actual-size orthographic projection views of the bracket. In
other words, the A2 limits you have set allow for a drawing scale of 1:1 (1 to
1) in this lab. This is fortunate, because anything other than a 1:1 drawing
scale requires a more advanced knowledge of AutoCAD than you currently possess
(More on this topic will be taught in Lab 4).
How AutoCAD Handles Printing and Line
Thickness
When you command AutoCAD to print your drawing, whatever is within your drawing limits will be printed according to the settings in the print dialog box. These settings must be set consistently with whatever assumptions you have made regarding the drawing limits and units - If your limits, frame and titleblock are setup to represent an A2 sheet of paper in landscape orientation, the settings in the print dialog box had better be millimeter units, paper size A2 and landscape orientation as well, or your print job will not go as smoothly as you hope!
If you are printing to non-color printers such as laser printers, you will want to examine the pen assignments pop-up menu in the print dialog box. AutoCAD maps different line thicknesses to each color you use in your drawing, and here is where the mapping is defined. Experienced AutoCAD users employ the pen assignment feature to give their drawings thick lined borders, medium lined objects, and fine lined text for maximum legibility and quality.
Dimensions
Dimensioning is the process of describing on a drawing the sizes and locations of the object's features in a technical and effective way. The basic criteria of a properly dimensioned drawing is that it contains all information required for manufacturing the object depicted, and it is important that the creator of the drawing provide this information without sacrificing the readability of the drawing.
Some of the basic dimensioning rules you should follow are:
1. Dimension each feature only once, ie.; don't repeat dimensions in an alternate view.
2. All dimensions should be outside part boundaries.
3. Extension lines may cross one another, dimension lines should not.
4. Extension lines should not touch the object.
5. All reference dimensions should be placed in brackets.
The first priority of dimensioning is to provide sufficient information to make the object depicted! The second priority is to present this information without clutter or confusion.
Consider the following metal plate, drawn in
1:1 scale.
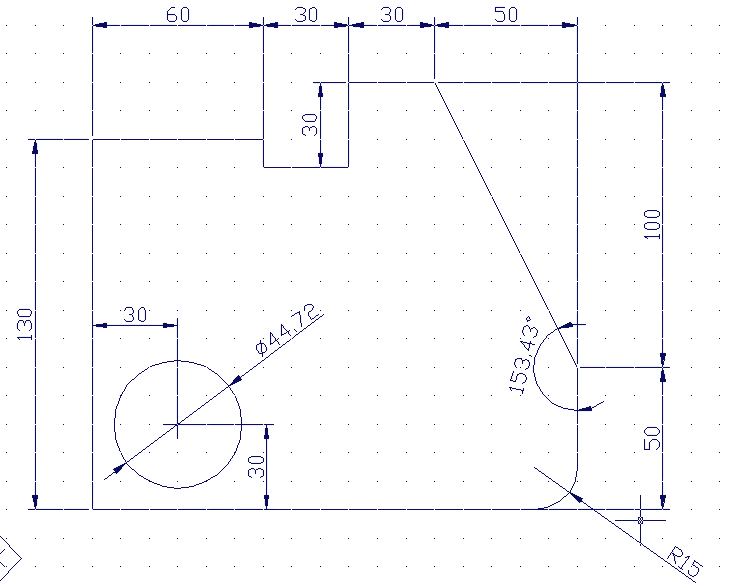
Figure 6: A Metal Plate
Drawing, Complete with Dimensions
Without the benefit of the dimensions (drawn in blue), this drawing would be of little use to a fabrication facility unless it was used as a pattern cut-out. With the dimensions included, however, this drawing is effective and complete in its description of the plate.
All of the dimensions shown above were created with AutoCAD's dimension commands: These commands are invoked from what is referred to as AutoCAD's dim mode.
You enter dim mode from the command prompt:
command:
dim
At this point AutoCAD unloads the code for its
drawing commands and loads the code required for dimension commands. AutoCAD
informs you this has happened by changing its command prompt as follows:
dim:
Most of the dimensions you will create are linear dimensions. They demark either horizontal or vertical linear distances. Here is a linear dimension in blue, with each of its parts named in red.
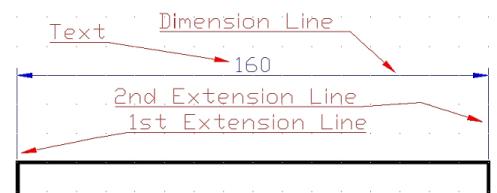
Figure 7: The Anatomy of a
Linear Dimension
AutoCAD's linear dimensioning tools prompt
you for:
· The first extension line origin
· The second extension line origin
· The dimension line location
· Any text you want entered instead of the distance
AutoCAD has automatically measured
The Dim Commands
Once you have entered dim mode, the side menu area will show you the basic dimension commands available to you. Here is a description of the ones you will need in this lab:
Horizontal
hor This
command dimensions horizontal distances.
Mouse-pick the endpoints (using osnap end, of course) of the object you want to dimension horizontally. Next,
mouse-pick the location of the dimension line and accept the default text.
Vertical
ver
This command dimensions vertical distances.
Mouse-pick the endpoints (using osnap end, of course) of the object you want to dimension vertically. Next,
mouse-pick the location of the dimension line and accept the default text.
Diameter dia
This command dimensions the diameter of any circle.
Mouse-pick the circle you want to mark the diameter of, and use the mouse to
set the length of the leader-line: Wherever you pick on the circle is where the
arrow will point. Remember that the O symbol with the slash through it means
"diameter".
Radius
rad This
command dimensions the radius of any circle of arc.
Mouse-pick the circle or arc you want to mark the radius of, and use the mouse
to set the length of the leader-line: Wherever you pick on the circle is where
the arrow will point.
Angular
ang
This command dimensions the angle between two lines.
Mouse-pick the two lines whose included angle you want to dimension. Now use
the mouse to set the radius and location of the finished dimension.
Changing your Dimensioning Style: Dim Vars
After a bit of experimentation with the dimensioning commands, you'll start to wonder how you can change the settings of the dim commands to produce bigger arrows, longer extension lines, different text sizes and fonts, etc. All of these settings are governed by the AutoCAD Dim Vars, a collection of 40 or so variables with bewildering names such as dimexo, dimaso, dimsoxd, etc.
A handy way to adjust these variables to
suit any dimensioning application is to call the ddim dialog box: This allows you full access to each dim
var through a friendly interface. For the purposes of this lab, however LEAVE
IT ALONE.
The
Dimension Scale Variable: Dimscale
The dimscale variable controls the scale of the dimensions you produce, and it has a global effect, much like the ltscale variable you mastered in the last lab: For the purposes of this lab ( A2 sized paper ) a value of 25 produces good results. If you create dimensions with the default dimscale of 1, you will not be able to see either the dimension text or arrowheads created.
Updating Previously Created Dimensions
Once a dimension is drawn, its features have been set based on the current dimvar settings. If any dimvars are changed later, the dimension will remain the same unless it is updated. You can do this by putting AutoCAD in dim: mode and executing the update command. Pick the dimension you wish to update, and you should see results right away.
Unit Control: How AutoCAD Formats Distances
and Angles
Not everyone uses the same units or even records distances and angles the same way. Architects prefer Imperial feet and inches notation, while others might use decimal numbers. Angles are measured counter-clockwise from the positive x-axis by Engineers and Mathematicians, while Surveyors and Geologists measure them clockwise from the positive y-axis. To make matters even more convoluted, not everyone requires the same amount of precision in their drawings: 1/8th of an inch precision is probably acceptable in a building layout, while 4 decimal places of accuracy are required in a complex machine part drawing.
AutoCAD manages all of these user-specific
preferences with its Units Control dialog box: This dialog box is called from the command prompt by typing
ddunits.
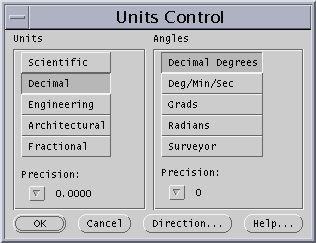
Figure 8: The Units Control
Dialog Box
In this lab, you don't require 4 decimal places of accuracy in your dimensions, so use this dialog box to set your units to a single decimal place of accuracy (0.0 in the Precision pull-down list-box). After you have done this, you will still need to update any dimensions you have already drawn.
Line Types Revisited
In technical drawings different line types are used to help distinguish the part from the dimensioning, and to help provide a clear description of the part geometry. Last week you drew a disk drawing which featured center lines, so this concept should not seem new to you.
The three primary line types are continuous (or visible) lines, center lines and hidden lines:
Continuous (Visible) lines are solid and are used for the edges and boundaries of the objects you are drawing. These lines are also used as extension and dimension lines, but in this case they are a different color and are plotted with a thinner pen.
Center lines are used for axes of symmetry such as the center of a hole or the center of a symmetrical part. They are typically a different color and thickness than the drawing's continuous lines
Hidden lines are used to indicate boundaries that are not visible or are hidden behind another portion of the object. These lines are usually a different color than the drawing's continuous lines, but are typically the same thickness.
These three linetypes are illustrated in Figure 11.

Figure 9: The Three Main
Linetypes
Layers
In the real world, AutoCAD drawings get filled with so much information they become more like visual databases than just drawings. An architectural floorplan (for example) will contain vast amounts of related information such as the concrete construction, the drywall layout, the window and door locations and orientations, the electrical system, the plumbing system and fixtures, the lighting layout and ceiling grid, not to mention the furniture layout and text notations, all coexisting in the same drawing space! As you can imagine, simple requests such as "Move that electricity socket 2 feet left along this wall" would be very difficult to perform with all of these objects overlaying each other in a multicolored tangle.
Consider another problem. You have drafted a complex drawing with centerlines, hidden lines and dimensions all over the place. Your boss shows up and requests a version without the dimensions for presentation purposes, and a second version with dimensions included but no hidden lines for the factory floor. What do you do? Create two versions of the drawing and worry about keeping them consistent with each other for the rest of your employment?
The solution to both of these situations' difficulties (and many others) is the AutoCAD feature of Layers. This feature allows you to define custom named layers which act like transparent sheets of plastic stacked on your drawing. Once defined, a layer can be used to store related drawing entities such as dimensions, hidden lines, centerlines, or whatever you like.
In the architectural floorplan example above, separate layers would be used to store the concrete walls, the drywall, the doors, the windows, the electrical system, the plumbing, the lighting, the ceiling grid, the furniture, and the text notations. A drawing organized like this allows the CAD technician to turn off unwanted layers, rendering the objects on them invisible and untouchable: Moving electricity sockets without mangling other objects is now a simple task.
In the engineering drafting problem above, separate layers would be used to store the centerlines, the hidden lines, the dimensions, and the actual drawing objects. Printing without dimensions or hidden lines is easily done without creating different versions of the file.
The Dynamic Dialog
Layer Modes Control: DDLModes
You can access the layer controls of your drawing by typing ddlmodes at the command line. This will cause a big dialog box to open which will allow you to create new layers, set the current layer, rename old layers, and change the color and linetype settings for each layer. Although the functionality of this dialog box is also available through the command line driven layer command, it is better to learn how to use layers with the improved user-friendliness of the ddlmodes command.
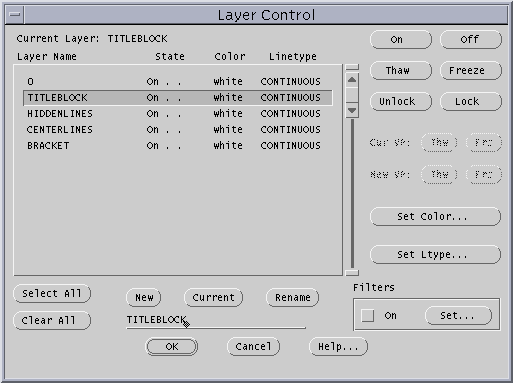
Figure 10: The ddlmodes
Layer Control dialog box
Bear in mind that this dialog box was orignally designed before such windowed operating systems as Windows '95 became universal on desk-top computers. It does not behave in a manner you might expect if you are used these operating systems and their standard dialog boxes. Here are a few of the layer control dialog box's idiosyncracies:
- To create a new layer you must type the name in first, and press the New button second
- To select any existing layer, you click on it to select. This does not unselect a previous choice!
- To unselect any existing layer you must click it again.
- To make any existing layer current you must select it first, and click the Current button second.
Using Layer Color & Linetype Properties
In the previous lab you
created hidden lines and centerlines without any knowledge of AutoCAD's layer
features. As a result, you were forced to use either the change or chprop commands to convert white continuous lines into the different linetypes
you required. Thanks to the power of AutoCAD's layer features, you don't have
to use such primitive techniques any more. Simply create a specific layer to
hold each of your colored linetypes (one layer for hidden lines, one for
centerlines, one for dimensions, etc.), and then set each layer's controls to
the required color and linetype through the ddlmodes dialog box. Now, when you draw anything on a
particular layer, its properties will default to those of the layer it is drawn
on.
Procedures
This is a general procedure to get your drawing done quickly and effectively:
- Set the drawing limits: Set the limits so that the entire drawing will
match the A2 paper it is meant to print on. Now set the grid to 10 and the
snap to 1, and zoom the drawing to the limits (See lab 1 for details, if
you've forgotten how).
- Set up your Layers: Using the ddlmodes command, create the bracket, titleblock,
dimensions, centerlines, and hiddenlines layers. Make sure to load the
Linetypes you need and set each layer to the appropriate colors and
linetypes. Finally, Set the current layer to titleblock.
- Set up the Titleblock: Draw a rectangular perimeter line at the
drawing limits to simulate the paper's edge. Now create your personal
titleblock in the lower right corner of this frame according to the
guidelines provided. Finally create a revision table in the upper right
corner. You'll want to get a closer look at your work with the zoom window
command - If you set your snap to 5 and turn the ortho mode on (
<F4> toggles ortho mode), creating neat table lines is a lot easier.
When you are satisfied with your titleblock and revision table, set the
current layer to bracket with the ddlmodes command
- Create the Front view: Choose the longest view of the bracket to be
the front view and create it in the lower left quadrant of your drawing.
Use the Specification Viewer to get the proper dimensions. Do not forget
to use the Osnap tools and polar notation while drawing.
- Create the Top View: Using the Front view as a reference, draw
construction lines as appropriate and form the Top view.
- Create the Side view: As you did in the last step, draw construction
lines from the Front view to form the Side View.
- Draw the dimensions: Use the ddlmodes command to change the layer to dimensions. and
create the dimensions on this layer. Set the dimscale variable to a value between 15 and 30 to set
the dimension feature size to your liking. \
- Dimension the three bracket views: Apply dimensions to the bracket using the
guidelines provided.
- Add the center lines: Switch the current layer to centerlines and
apply neccesary center lines for circles and axes of symmetry.
- Create the hidden lines: Set the current layer to hiddenlines and draw
any hidden lines (like the bottom of the 5 mm groove as seen from the
front view, for example). If you are unsatisfied with the spacings on your
hidden and centerlines, you can always change the ltscale variable to adjust them globally (see lab 1
again if you have forgotten this variable).
Deliverables
- Create a single drawing file containing a three-view orthographic projection of the bracket, drawn so that the largest view of the bracket is the front view. When you are finished, your drawing should look somewhat like this.
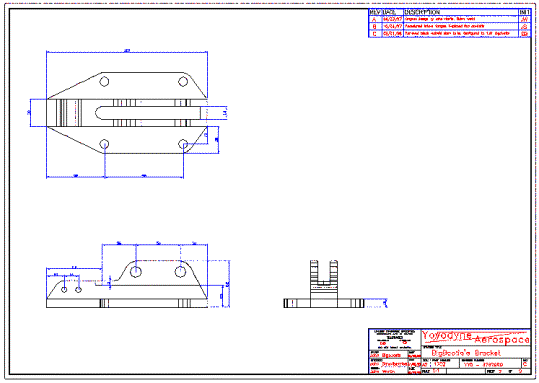
Figure 11: Example of a
Finished Drawing
· The drawing must be made to fit metric standard A2 paper (420mm x 594mm) and must have a boundary rectangle drawn around this area to simulate the paper's edge. Do not overlook that the drawing should be in landscape orientation, which means that the horizontal (X-axis) dimension is larger than the vertical (Y-axis) dimension.
· The drawing must include a proper titleblock and revision table of your own original design. Be as inventive as you like, but try to keep your design legible.
· The layers of your drawing must be configured with a specific layer for each of these object types:
1. Titleblock & Revision Table objects (Layer name: titleblock)
2. Dimensions (Layer name: dimensions)
3. Center Lines (Layer name: centerlines)
4. Hidden Lines (Layer name: hiddenlines)
5. All the objects that make up the bracket itself (Layer name: bracket)
